12 Apr 2023 19 min read
The Complete Git Guide

By Sachin Dey
Head of Infrastructure
The Complete Git Guide by Sachin Dey - Antarctica Global
At the heart of an efficient SDLC lies the Source Code Management (SCM).
I use Git along with Bitbucket for collaboration between our development teams.
A Distributed Version Control System (DVCS) has been a crucial component for successful collaboration among developers. While there have been many utilities developed for SCM (SVN, Fossil, Git) through the last few decades, Git became the most preferred by developers. The credibility of this specific tool has been proven by multiple open source projects, specifically due to the Linux kernel for which it was developed by Linux Torvalds. Not to mention that GitHub itself - The Source Code Management service - uses Git at its core and has made it easy for new developers and open-source projects to adopt it.
I am going to walk you through the most commonly used Git commands using a workflow.
This guide includes certain git commands along with their explanation of what it does along a workflow.
The Introduction
A git project begins with a directory initiation where the source code is stored.
$ cd path/to/project_directory
$ git init
- You should change to directory where you will be keeping your project source code
- The “git init” command add the necessary configuration so that the directory could be used for tracking changes made to the files in the directory
After few files have been added to the project directory, these new files have to be added to git to be tracked for changes
$ git add server.js app.js
- This command adds the files “server.js” and “app.js” to be tracked by git for changes
If many more files have been added to the directory and you want to add all of them for git to track for changes use the below command
$ git add .
- This adds all the files from the current working directory to be tracked by git
- Includes files inside sub-directories
Once the files are added, these files have to be committed to git so that you can track what changes were made when
$ git commit -m “Adding app.js for initial project configuration”
- The commit has to be made with a message which can easily give you an idea of the changes made to your source code
- The message here is added between double quotes after the -m parameter
The above method is a way of writing short commit messages.
You may write a commit message with a lot of description for the changes you have made with the below command.
This command would not work if you have already made the commit with short message from above
$ git commit
- This opens up the CLI text editor for your write your commit message
- The long commit message has a generic format of how it is displayed by SCM services
- First line is the Heading
- Leave an empty line after Heading
- In between is the message Body
- Leave an empty line before the Footer
- Last line is the Footer
Once the commit message has been added it is time to push the repository to the SCM so other developers can pull and work on the project too.
$ git push
- This will push the local changes to the SCM
- There’s a catch with this one though, if you have been following this guide and the command will likely fail with an error.
- Right now git does not know where to push the changes
To push the changes to a Source Code Management service you will have to sign up to a service similar to Bitbucket, Github or Gitlab.
For advancing this guide I am using the bitbucket for SCM.
$ git remote -v
- This lists all the remote SCM where the code changes could be pushed
- An empty output of this command means adding new remote to this repo
For adding a remote repository which has been created at bitbucket you would have a similar URL repo for your bitbucket repository.
$ git remote add origin https://bitbucket-username@bitbucket.org/bitbucket-workspace/your -project-repo.git
- In this URL bitbucket-username would be replaced by your username created on bitbucket
- bitbucket-workspace would be replaced by your workspace name you created while signing up on bitbucket
- your-project-repo.git would be replaced by repository name you created for your project
Now you are ready to push your changes
$ git push
Branching and Merging
The previous section of git is good enough to get you started with pushing code.
The real-world workflow often includes code moving through different branches.
- A git branch is a separate version of the repository which maintains different changes from the main branch.
- A git merge is a process that occurs when a separate branch is merged into the main branch.
- A main branch is the one where you have been pushing code to during the previous section of this guide. It is always created when you initialize a git repository. It is also called the master branch most of the time.
- One of the purposes of having different branches is to ease collaboration between multiple developers so each developer can maintain their own work.
A Sample Workflow
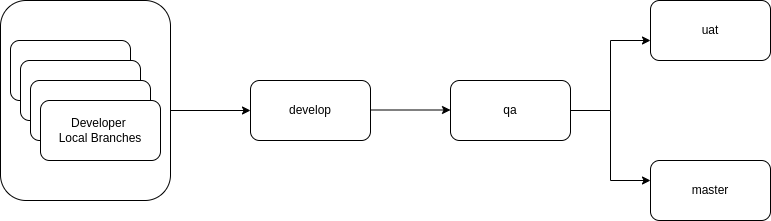
Diagram: Code Flow through Branches
As per the above diagram, the workflow is:
- Each developer runs their own local branch on their machine while writing code
- All local branches are pushed and then merged into the single develop branch
- All release code commit is taken from the develop branch and merged to qa branch
- The same released code commits from qa is then pushed and merged into the uat and master branch
Local branch
This is how the flow of the code would be using commands
Check the list of all branches
$ git branch -v
- This will list all the available branches locally
- The branch name which has * will be the current in use branch
Creating new branch from the current branch
$ git checkout -b feature_auth
- Developer creates a local branch named feature_auth from main branch to work on a feature
- This creates and also switches to new branch feature_auth
If a local branch already exists, the developer would simply have to switch/checkout the branch
$ git checkout feature_auth
- This assumes the branch feature_auth already exists
- This command can be used to switch/checkout different branches
- Replace feature_auth with the different branch name
Once the changes have been made to the local branch, add the files and commit these changes.
$ git add .
$ git commit -m “Feat: initial authentication commit”
- These will commit the changes made in the feature_auth branch
Pushing the changes to centralised bitbucket repository
$ git push
- This pushes the local branch and its commits to the bitbucket or other centralised git repository
- This command would fail if the feature_auth branch does not exist in the centralised repository
If the previous command fails, since this is a new branch then this new branch information must be pushed to the central repository.
Here are all Three commands which do this but maybe outdated according to the git version.
$ git push --set-upstream origin feature_auth
$ git push --set-upstream-to origin feature_auth
$ git push -u origin feature_auth
- The third command is short for the above command
- Either of these commands will push the local branch to centralised repository
Branch merging
Now the local branch named feature_auth is to be merged into the develop branch.
This is an example of how a one branch is merged into another branch but in real-world workflow a lot of branches will be merging into this develop branch
Once all the commits have been made to local branch, switch/checkout to develop branch
$ git checkout develop
- This switches to develop branch
- To verify run “git branch -v” to check the current in use branch
Once switched/checkout to develop branch merge the local branch
$ git merge feature_auth
- This will open up the text editor to write a commit message for the merge
- Merges are also committed into the long list of commit logs of a project

Branch merging in real life :D
Pull Requests
In the real-world you won’t be doing branch merges through a command. It will be done using PR (Pull Request) which is how SCMs manage merges for collaboration.
Instead of doing a “git merge” of feature_auth to develop, you would be raising a Pull request for merging feature_auth to develop.
This PR is reviewed and then merged to the target branch from a centralized SCM service like Bitbucket or Github.
- Pull Requests are merges done at a central repository
- Pull Requests are merge requests from a forked repository
- Pull Requests display the changes (git diff) made between the target and source branch
- Local branch would be the source branch
- Develop branch would be the target branch
Viewing Difference or Changes
While you have been working on your project you can view the changes between your work and the previous commits
Listing all of your commits shows you the commit hash (hexadecimal), Author, Date and Commit message
$ git log
- Commit logs can be used identify the commit Author, time of commit
- Commit logs are displayed in New (Top) to Old (Down) order
See the changes made between Two different commits
$ git diff c390f88c9c419368270f582d6f2bae72df29d465 735d1bba6fd993eb8cc93fde33cd2a0455194dcf
- This commit hashes can be taken from the git log command which displays
- The first hash is older and second hash is newer
The format of changes displayed by git diff includes
- If a change includes removal a – prefix is added to the changed lines
- If a change includes addition a + prefix is added to the changed lines
Collaboration
There is a possibility of different collaboration workflows depending on how organizations are set up. A git repository could be used by a single team or multiple teams in case of an open-source repository.
A Single Team Scenario
A developer working on the project would go through these processes
1. Clone an existing project’s git repository
- A clone of a repository is made to keep your local changes separate from the central git repository
$ git clone <REMOTE_URL>
- The <REMOTE_URL> is available from the SCM service when you visit it on your web browser
2. Adding changes
- You would create a new branch from development branch
$ git checkout -b feature_WM12
- This would create and switch the new branch feature_WM12
- Add your changes in this new branch
3. Merge new changes from development into your local branch
- This is a optional process if you want to include some new changes that may have been pushed to the development branch while you were working on your branch
$ git merge origin/develop
- This merges the development branch from centralized repository to your local branch
4. Push
- Push your changes with your branch to the remote centralised repository
5. Create PR
- Create a Pull Request to the development branch with your branch as source
A Multi Team Scenario
A developer working on the project would go through these processes
1. Fork the repository
- A fork is a also the clone of a repository meant to keep local changes
- Currently the term is used for having a clone in your own SCM account
- This means forking someone else’s repo which creates the repo in your own Bitbucket or Github account
2. Adding changes
- Add the changes to your own branch
3. Push
- Once you have satisfied with your changes
- Push changes to your forked repository
4. Create PR to upstream
- Upstream is the original repository from which you forked your repository
- Create a Pull Request from your branch to upstream’s branch
Miscellaneous Configurations
Git uses your email address as your identification for commits
Here is how to globally configure your email address and name for git
$ git config --global user.name “Sachin D”
$ git config --global user.email “sachin@givmail.com”
The difference between global and local configuration is that global is used for all git repos you work on.
While local can help you use a different identity (email) for each git repository.
$ git config --local user.name “Sachin D”
$ git config --local user.email “sachin@givmail.com”
Have you created too many branches? You may delete them
$ git branch -d feature_auth
- This will delete the branch feature_auth
--
That's it for now :)
Comment if you have any question, happy to develop!
#systemdesign
#coding
#git
#scm
#sourcecodemanagement


12 High-Fives

Share
WRITTEN BY
By Sachin Dey
Head of Infrastructure

Antarctica is a software concept, design and development company that builds easy to use applications and architects complex to build ecosystems. We do it for people who believe just like us that fighting climate change isn’t an option, it is our generation’s utmost duty.
So we made it simple: the things we do, the products we build, the services we render, must either protect our mothers or protect Mother Nature. Said otherwise, our mission is to either save lives or save Life, penguins included.
We are the good side of technology. We are Antarctica.
Enjoyed that? Read
more by Sachin Dey
Liked what you read, we think you might also like the following blogs

You may also like!
Liked what you read? We think you might also like the following blogs.